Article Number: 3323
Introduction To Schluter Systems - Ditra & Kerdi
By Hugh Scott
The world around us is constantly changing, adapting expanding. We must adjust, reform, conform, adapt. This was how the Schluter rep put it when he first showed me the Ditra products.
I had to step into the tile shop to pick up my load for the day, and I really did not have time to be pandered. My crew was restless, wanting to start the clock. We were sitting inside waiting for our load to be brought up when the rep started talking. I half-listened at first, but the more he said, the bells started going off in my head.
Install right over plywood?? Install right over drywall ..What?? Is this guy cracked??
He then started explaining the adhesion concepts and applications and when he mentioned unmodified thin-set I started turning off. He was astute and picked up on my disinterest, so he began explaining the intelligence of thin-sets (Something I should have known already).
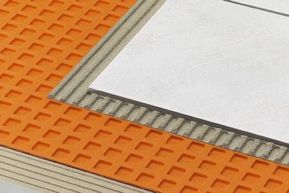
He then showed me the polyethylene fleece and started explaining the uncoupling process of the Ditra. I was a dyed-in-the-wool Durock guy and I did not like Hardi and I despised fiber-rock.
Hardi would not allow a full countersink of the screws without snapping the heads off. If you did not wipe each area with a sponge as suggested by Hardi, the dust content in the board might inhibit adhesion. Fiber-rock was not nearly dense enough and far too brittle for I felt that if I could tear a piece off with my hands, it may not offer a good support system for ceramic tile.
We could work with Durock by simply mud-setting it and using the roofing nailer, setting one every 6 inches, and after taping the seams you were good to go. Your hands were raw, each tool was scuffed, and there was a layer of grit that seemed like it could never be fully swept up- but it was ready for tile!
He was privy to all these issues and had an answer for everything. I balked at the term uncoupling for it was hard to swallow the concept and I felt it belonged back in the rail yards of the Austrian frontier from whence it came. I eventually saw the terms intended application.
We then started discussing the time factor which now drew the obvious interest of my crew . We were all fully interested by now, for the thought of less work to achieve the same goal was just as interesting to them as it was to me, probably more so me since I was paying the labor tab. With the Ditra principals understood we gravitated to the Kerdi and the shower systems concepts.
A pre-formed pre-sloped shower pan- it seemed to good to be true! He was telling me that the days of mud-packing that upstairs shower were over. No more pre-slopes, no more left over sand to be filtered into the customers flowerbeds or yard. No more mud boxes creating messes that if left too long would require the pressure washer application.
He explained the counter-effects of plastic behind Hardi or Durock and how the plastic would draw condensation causing the CBU to wick moisture and how our enemy the water would find the path of least resistance. This explained why so many re-models we were called on to do had rotted studs and mildew growing in the walls, even when the installation was up to code.
He took a piece of Kerdi cut 4 square, cut it from the center, and rolled the edges around to form a pixie cup and then filled it with water. It did not leak! Although there was a pinhole at the bottom, the compressive nature of the fleece would not allow the water to drip out the pinhole.
I was sold! I saw an infallible moisture proof system. No liquid membrane could compare to this, and I was convinced that there was nothing like it on the market. There were some similar applications, but nothing as workable and agreeable to the installer.
I was hesitant to use the shower trays at first. The first month I used the Kerdi, I still was pulling the shower floors then lapping the Kerdi over the mud-bed and using the drain the plumbers had set. The Styrofoam pre-sloped pan was a little much. I could not fathom the compressive strength they said was available, preventing indention of the tray.
This was when I happened to see a install DVD produced by Schluter that showed Case 185 Loaders driving on their Styrofoam radiant heat application called Bekotec. This style of application is a Styrofoam base with 2 towers with hydrotubes running between them. This in turn is screeded with concrete and then tile is laid over it. The loader was on the new tile delivering boxes of tile to the incomplete end of the area. This application is used extensively in Mercedes Benz Showrooms in Europe.
I was now encouraged to try the trays and I have not pulled one shower floor since. The Kerdi drain is integrated to the pan and creates a failsafe application. Kerdi offers pre-formed corners (we worked without them for years) for the DIYer and this too saves valuable time.
The normal time frame to prep a shower was :
1-2 hours removing the sheetrock and plastic the studs.
2-4 hours hanging the hardi or durock
3-4 hours pulling the pan, 1 bag Portland cement,4-1 mix on the sand.
Wrap the wood curb 1 hr with concrete.
Now it had to set for two days or longer.
6-10 hours and I could still not install tile for two days.
Cost for Labor Estimate: $388.00-$450.00
Cost for material Estimate: $100.00-$200.00
Time line for a Kerdi Kit:
No drywall removal. I used modified thin-set over drywall although Schluter recommends unmodified. I disagree, for the drywall will breathe and your working time is longer and with the modified you also get a stronger bond. This is based on actual experience.
Precut the Kerdi allowing for 2 overlap on each seam, 45 minutes.
Install the Kerdi 1.5-2 hours.
Install the shower tray 25 minutes.
Modify the Kerdi drain to existing plumbing: Most of this should be done prior to the install. Figure out your drain size, confirm if you need adapters and be sure the drain sits at the proper level in the tray integration area. With the proper foresight this can be done within 30 min -1 hr.
Install the preformed curb, 30 minutes.
Install the four preformed inside corners, two outside corners around the curb, the Kerdi band and Kerdi on the tray 1-2 hours or less.
Let it all set up over night.
3-5 hours, install within 24 hours.
Kit cost (from me) $363.00 (this is based on a 48x48 shower) (MAP pricing is. 403.92)
Installation cost (what I charge) $250.
Time saved: 3-6 hours, enough time to go get the upstairs shower ready for tile. How much is your time worth? Mine is worth $50-100 per hour.
Time line for CBUs:
Average room size: 200-250 ft
Weight handled: 750 lbs
Tools needed: Grinder, dust mask, gloves tape measure, cutting area, screws or nails.
(Be careful board does fall against wall or cabinets and be sure you do not ding up door casing when bringing it in the room)
CBU will run about .65 per ft.
Modified thin-set: $10-14 per bag unmodified under, modified over, spread rate 80 -120 ft per bag.
200 ft under ¼ notch trowel 2 bags Unmodified, 200 ft and over, 2 bags modified.
Cost: $191.00
Labor; 4-6 hours.
Time line for Ditra:
200 ft -250
Weight handled: 25-40 lbs
Tools needed: Knife, tape measure.
(No way to damage the walls or door casing when bringing it in.)
I sell Ditra by the roll for $1.18 per ft (MAP pricing is 1.63 per ft)
Modified thin set under, over plywood, 3/16 'V' notched trowel spread rate 120 180 ft per bag.
Unmodified over, spread rate, 50-100 ft per bag.
Cost: $276.00
Labor: 1.5-2 hours
Again, how much is your time worth?
The world around us is constantly changing, adapting expanding. We must adjust, reform, conform, adapt. This was how the Schluter rep put it when he first showed me the Ditra products.
I had to step into the tile shop to pick up my load for the day, and I really did not have time to be pandered. My crew was restless, wanting to start the clock. We were sitting inside waiting for our load to be brought up when the rep started talking. I half-listened at first, but the more he said, the bells started going off in my head.
Install right over plywood?? Install right over drywall ..What?? Is this guy cracked??
He then started explaining the adhesion concepts and applications and when he mentioned unmodified thin-set I started turning off. He was astute and picked up on my disinterest, so he began explaining the intelligence of thin-sets (Something I should have known already).
He then showed me the polyethylene fleece and started explaining the uncoupling process of the Ditra. I was a dyed-in-the-wool Durock guy and I did not like Hardi and I despised fiber-rock.
Hardi would not allow a full countersink of the screws without snapping the heads off. If you did not wipe each area with a sponge as suggested by Hardi, the dust content in the board might inhibit adhesion. Fiber-rock was not nearly dense enough and far too brittle for I felt that if I could tear a piece off with my hands, it may not offer a good support system for ceramic tile.
We could work with Durock by simply mud-setting it and using the roofing nailer, setting one every 6 inches, and after taping the seams you were good to go. Your hands were raw, each tool was scuffed, and there was a layer of grit that seemed like it could never be fully swept up- but it was ready for tile!
He was privy to all these issues and had an answer for everything. I balked at the term uncoupling for it was hard to swallow the concept and I felt it belonged back in the rail yards of the Austrian frontier from whence it came. I eventually saw the terms intended application.
We then started discussing the time factor which now drew the obvious interest of my crew . We were all fully interested by now, for the thought of less work to achieve the same goal was just as interesting to them as it was to me, probably more so me since I was paying the labor tab. With the Ditra principals understood we gravitated to the Kerdi and the shower systems concepts.
A pre-formed pre-sloped shower pan- it seemed to good to be true! He was telling me that the days of mud-packing that upstairs shower were over. No more pre-slopes, no more left over sand to be filtered into the customers flowerbeds or yard. No more mud boxes creating messes that if left too long would require the pressure washer application.
He explained the counter-effects of plastic behind Hardi or Durock and how the plastic would draw condensation causing the CBU to wick moisture and how our enemy the water would find the path of least resistance. This explained why so many re-models we were called on to do had rotted studs and mildew growing in the walls, even when the installation was up to code.
He took a piece of Kerdi cut 4 square, cut it from the center, and rolled the edges around to form a pixie cup and then filled it with water. It did not leak! Although there was a pinhole at the bottom, the compressive nature of the fleece would not allow the water to drip out the pinhole.
I was sold! I saw an infallible moisture proof system. No liquid membrane could compare to this, and I was convinced that there was nothing like it on the market. There were some similar applications, but nothing as workable and agreeable to the installer.
I was hesitant to use the shower trays at first. The first month I used the Kerdi, I still was pulling the shower floors then lapping the Kerdi over the mud-bed and using the drain the plumbers had set. The Styrofoam pre-sloped pan was a little much. I could not fathom the compressive strength they said was available, preventing indention of the tray.
This was when I happened to see a install DVD produced by Schluter that showed Case 185 Loaders driving on their Styrofoam radiant heat application called Bekotec. This style of application is a Styrofoam base with 2 towers with hydrotubes running between them. This in turn is screeded with concrete and then tile is laid over it. The loader was on the new tile delivering boxes of tile to the incomplete end of the area. This application is used extensively in Mercedes Benz Showrooms in Europe.
I was now encouraged to try the trays and I have not pulled one shower floor since. The Kerdi drain is integrated to the pan and creates a failsafe application. Kerdi offers pre-formed corners (we worked without them for years) for the DIYer and this too saves valuable time.
The normal time frame to prep a shower was :
1-2 hours removing the sheetrock and plastic the studs.
2-4 hours hanging the hardi or durock
3-4 hours pulling the pan, 1 bag Portland cement,4-1 mix on the sand.
Wrap the wood curb 1 hr with concrete.
Now it had to set for two days or longer.
6-10 hours and I could still not install tile for two days.
Cost for Labor Estimate: $388.00-$450.00
Cost for material Estimate: $100.00-$200.00
Time line for a Kerdi Kit:
No drywall removal. I used modified thin-set over drywall although Schluter recommends unmodified. I disagree, for the drywall will breathe and your working time is longer and with the modified you also get a stronger bond. This is based on actual experience.
Precut the Kerdi allowing for 2 overlap on each seam, 45 minutes.
Install the Kerdi 1.5-2 hours.
Install the shower tray 25 minutes.
Modify the Kerdi drain to existing plumbing: Most of this should be done prior to the install. Figure out your drain size, confirm if you need adapters and be sure the drain sits at the proper level in the tray integration area. With the proper foresight this can be done within 30 min -1 hr.
Install the preformed curb, 30 minutes.
Install the four preformed inside corners, two outside corners around the curb, the Kerdi band and Kerdi on the tray 1-2 hours or less.
Let it all set up over night.
3-5 hours, install within 24 hours.
Kit cost (from me) $363.00 (this is based on a 48x48 shower) (MAP pricing is. 403.92)
Installation cost (what I charge) $250.
Time saved: 3-6 hours, enough time to go get the upstairs shower ready for tile. How much is your time worth? Mine is worth $50-100 per hour.
Time line for CBUs:
Average room size: 200-250 ft
Weight handled: 750 lbs
Tools needed: Grinder, dust mask, gloves tape measure, cutting area, screws or nails.
(Be careful board does fall against wall or cabinets and be sure you do not ding up door casing when bringing it in the room)
CBU will run about .65 per ft.
Modified thin-set: $10-14 per bag unmodified under, modified over, spread rate 80 -120 ft per bag.
200 ft under ¼ notch trowel 2 bags Unmodified, 200 ft and over, 2 bags modified.
Cost: $191.00
Labor; 4-6 hours.
Time line for Ditra:
200 ft -250
Weight handled: 25-40 lbs
Tools needed: Knife, tape measure.
(No way to damage the walls or door casing when bringing it in.)
I sell Ditra by the roll for $1.18 per ft (MAP pricing is 1.63 per ft)
Modified thin set under, over plywood, 3/16 'V' notched trowel spread rate 120 180 ft per bag.
Unmodified over, spread rate, 50-100 ft per bag.
Cost: $276.00
Labor: 1.5-2 hours
Again, how much is your time worth?
 |
Web Design
Friday, April 19, 2024

Flooring Website Design
Building Flooring Websites since 1996Zip2Biz is a perfect match for non-techies flooring retailers planning to launch their own websites, as well as for flooring dealers whose current website design is difficult to maintain, costing them too much money, or they would rather be selling flooring than dealing with a website?
learn More