|
 |
||
how to install carpet
How To Install Carpet
Welcome to the How-To clinic for installing
indoor/outdoor carpet. Indoor/outdoor carpets have been vastly
improved over recent years and are extremely durable. For the
in's and out's of installing your own, we'll lay down the rules
for you. Please read on.
Measure all room/area dimensions and transfer
these measurements to graph paper. This helps visualize the width of
the piece of carpet you'll need to go with (6 or 12 feet wide). After determining the width, measure the amount of
lineal feet required. Add 6 inches each way to allow for uneven cuts or
out of square walls. Preparing
Yourself You will need:
First, consider the situation (area, traffic,
moisture) to help determine the installation method. Here's how.
For fully exposed outdoor installations the
recommended method is full-spread adhesive (glue-down). Using
double-faced carpet tape may work, but may not hold up under all weather
conditions.
For protected outdoor installations and indoor
installations, you can install with adhesive or double-faced tape.
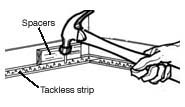
Remove any doors that will swing over the carpet. Make sure the floor is clean and even. Place double-faced tape around the edge of the
room and place 6-inch x 6-inch "X" every two feet over the
room area. Leave the protective paper on the top side of the tape. Laying
the Carpet Place the carpet in the room and center it. If there is a wall that has no projections or
openings, put the carpet flush against that wall and trim the other
sides. Make sure the carpet is centered. Fold the carpet
in half over itself being careful not to disturb its position. Remove the protective paper from the tape and fold
the carpet back into place carefully. Repeat the other half. Smooth the carpet near the wall. When you begin
trimming, make your cut parallel to the floor, cutting a
"V" at the corners to fit. Remove the excess carpet and walk along the edges
so the carpet will adhere to the tape. Seam the doorways to any adjacent rooms or use a
metal binder strip or aluminum saddle. Check all the seams and ends for any loose face
yarn ends. Clip with scissors to the height of the surrounding pile. Re-hang any doors. It
Seamed Easy
After cutting, roll the carpet the opposite way (nap
faces in) to reduce waves before installing.
How to
Make it Seam Right Overlap the two pieces at the seam by two or three
inches. Use a white chalk line to make a line on the back
of the top piece, approximately 1/2 the width of the overlap or
about 1 1/2 inches from the edge. With a straightedge, make a cut along the chalked
line. To cut the bottom piece of carpet use the top cut
piece as a guide, pressing it firmly against the bottom piece as you
cut. Make a series of 2-inch cuts every two to three feet, through
the bottom piece. With the straightedge and a sharp utility knife,
make the cut using the 2-inch cuts as guides. Fold back one piece of the carpet at the seam and
put double-faced tape on the floor along the edge of the remaining
piece. Pull back the other piece of carpet, and put
another strip of tape along the seam edge. Remove the protective paper from both pieces of
tape, lay one piece of carpet back down on the floor, and position
the full piece. Apply a thin bead of seam adhesive along the side
of the cushion of the carpet that is already taped to the floor. While the adhesive is still wet, butt the two
edges of the carpet pieces together. The two edges may form a slight buckle. If so,
press down until it becomes nearly invisible. Clean any adhesive off of the carpet immediately. Trimming When trimming against a wall, hold the knife parallel
to the floor while trimming. This will give you a little extra carpet
that will need to be tucked down after securing it. Trimming should be
done around the entire perimeter of the room.
© 2008 FloorBiz, Inc. All Rights Reserved | |||
 |
 |